
Our friends at Strava have proven once more that great brains can come with brawn. Txgh, which they have recently open sourced under an Apache license, is a neat little Sinatra server that serves as a bridge between Transifex and Github.
It ensures you always have up-to-date translations in Github, and that the source text in your Transifex resources are kept up-to-date with the text in Github.
Here’s how I set-it up, from scratch, in a few hours.
What you’ll need:
1) A free Amazon EC2 instance. I chose the basic free Amazon Linux AMI which should be enough. It comes with Ruby, Git and pretty much all you need. If you don’t want to use EC2, you can use any kind of server with a recent version of Ruby installed with the ability to receive and send HTTP API traffic from the internet.
2) Maintainer access to your Transifex project.
3) The ability to add Service Hooks to your Github repo.
Once you’ve got your EC2 instance, connect to it using ssh. You’ll do all your work from there. Take a note of its public DNS name, as you’ll need it later.
# Make sure you have all the build tools installed
sudo yum groupinstall "Development Tools"# Install dependencies
sudo yum install -y gcc-c++ patch readline readline-devel zlib
zlib-devel libyaml-devel libffi-devel openssl-devel make bzip2
autoconf automake libtool bison iconv-devel
# Install RVM
bash -s stable < <(curl -s https://raw.github.com/wayneeseguin/rvm/master/binscripts/rvm-installer)
# Install Ruby
rvm install 1.9.3
# Install Bundler
gem install bundler --no-rdoc --no-ri
# clone txgh

git clone https://github.com/jsilland/txgh.git
# cd txgh
Now you will create the txgh config file. It’s a YAML file, which looks like this:
txgh:

    github:

       repos:

           <your/full/repo/name>:

                api_username: <your Github API username>

                api_token: <your Github API token>

                push_source_to: <transifex project slug>

   transifex:

        projects:

            <transifex project slug>:

                tx_config: "/path/to/.tx/config, see below if you do not have any"

                api_username: <Transifex API username>

                api_password: <Transifex API password>

                push_translations_to: <full/github/repo/name>
# edit txgh config file

vim config/txgh.yml

# paste the contents above and edit to fit your configuration
If your Transifex project currently uses the command line client, you probably have a Transifex config file checked into your repo. Its default location is under a .tx/ folder in the root of your git repo. If it doesn’t contain one, use this support article to create one, or use this template:
[main]

host = https://www.transifex.com
[<transifex project slug>.<transifex resource slug>]
 file_filter = ./Where/Translated/<lang>/Files.Are
 source_file = ./Where/Source/Files.Are
 source_lang = <source lang>
 type = <FILETYPE>
Finally, start the server:
# install bundled gems
bundle install# start the server
bundle exec rackup
Puma 2.5.1 starting...
* Min threads: 0, max threads: 16
* Environment: development
* Listening on tcp://0.0.0.0:9292
Now, you can keep the server running, and go configure the webhooks in Transifex and in Github:
How to configure webhooks in Github. You will want to point the new service hook you’ve created to:
<code>http://<public DNS name>:9292/hooks/github</code>
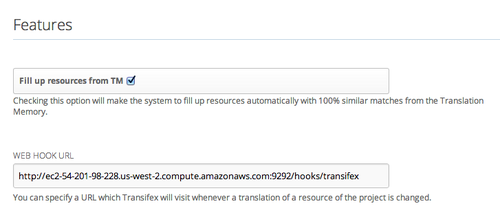
To configure your webhooks in Transifex, you will need to go to your project management page and point the webhook URL to:
<code>http://<public DNS name>:9292/hooks/transifex</code>
That’s it! While this starts the server in development mode in a free ec2 server, if you do any kind of larger scale development, you would probably want to run this on a more stable instance, in production mode, with appropriate monitoring. But once you’ve configured the webhooks, any change that makes a file be 100% translated in Transifex will trigger the server to push a new commit to Github with the updated translations files, and any change in Github to the source files will trigger the server to update the source content in Transifex.
Happy localizing!
Read Next: Eating Your Own Dog Food: Managing a Continuous Localization Project