


TX Labs: A Space for Accelerated AI Innovation
3 min read
Bitbucket is a service that lets you host and share code with other users. Bitbucket supports version control using and Mercurial. In this post, we’ll show you how to synchronize changes between your projects hosted in Bitbucket and your localization projects in Transifex. We’ll also post a blog on how to integrate Transifex with Bamboo, a popular continuous integration service, so don’t forget to check out our blog later this week!
If you’re unfamiliar with version control, we recommend reading our previous post on version controlled translations with Git. Version control systems (VCS) track changes to files across multiple users. Most version control systems are based around three core concepts:
Version control helps developers coordinate code changes while reducing the chances of conflicts or data loss. While there are multiple version control systems available, the examples in this article use Git simply due to its popularity.
To start, we’ll create a new repository in Bitbucket via the web UI. After logging into your account (new accounts are free), click on the “Create” dropdown button, then click “Create Repository.”
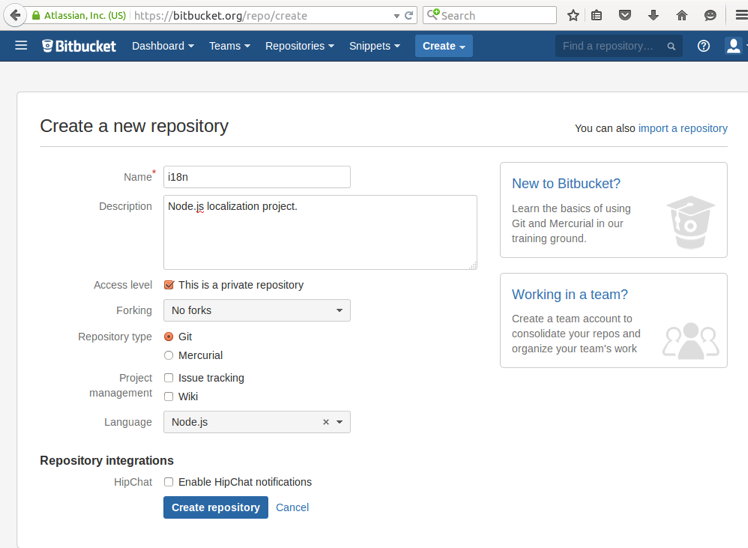
Enter the details of your repository. You can modify the visibility settings of your project and allow other users to “fork” your project, which lets them create and work on a copy of your repository. You can also add bug tracking, add a Wiki, or select a base language for the codebase. When you’re ready, click “Create repository.”
By default, your new repository will be empty. You can use a version control system to push project files to Bitbucket, or you can import an existing repository from another code hosting service. In this example, we’ll use an existing Git repository for a NodeJS project stored locally on a Linux desktop. We’ll change the working directory to the project folder, use git remote add to add the remote repository, then push our project to the remote repository.
$ cd /home/transifex/projects/i18n

$ git remote add origin https://bitbucket@bitbucket.org/bitbucket/i18n.git

$ git push -u origin --all
Once the command completes, you should be able to browse your Git repository through the Bitbucket website.
As you make changes to your local code files, you’ll need to update the Bitbucket repository. Imagine we have a file named “i18n.js,” which contains a list of all the locales used in the project. We decide to change a locale, so we update i18n.js. With Git, you can view changes between the repository’s current state and the last commit using the command git status:
$ git status
On branch master
Your branch is up-to-date with 'origin/master'.

Changes not staged for commit:
  (use "git add ..." to update what will be committed)
  (use "git checkout -- ..." to discard changes in working directory)

	modified:   i18n.js

no changes added to commit (use "git add" and/or "git commit -a")
Git uses a staging area to temporarily store files before committing them, allowing you to customize a commit by including or excluding certain changes. We’ll add i18n.js to the staging area, then create a new commit:
$ git add i18n.js
$ git commit -m "Added new locale: es_ES"
[master 6a9f8d5] Added new locale es_ES
 1 file changed, 1 insertion(+), 1 deletion(-)
To update the Bitbucket repository, use the git push command. origin specifies the name of the remote destination, while master specifies the name of the local branch being pushed. You may be prompted for your Bitbucket account password:
$ git push origin master
Password for 'https://bitbucket@bitbucket.org':
Counting objects: 5, done.
Delta compression using up to 2 threads.
Compressing objects: 100% (3/3), done.
Writing objects: 100% (3/3), 298 bytes | 0 bytes/s, done.
Total 3 (delta 2), reused 0 (delta 0)
To https://bitbucket@bitbucket.org/bitbucket/i18n.git
   45cff79..6a9f8d5  master -> master
If you need to pull changes from a remote repository into a local repository, for instance, to incorporate changes from another developer, use the git pull command:
$ git pull
remote: Counting objects: 3, done.
remote: Compressing objects: 100% (3/3), done.
remote: Total 3 (delta 2), reused 0 (delta 0)
Unpacking objects: 100% (3/3), done.
From https://bitbucket.org/bitbucket/i18n
   6a9f8d5..776aa6d  master     -> origin/master
Updating 6a9f8d5..776aa6d
Fast-forward
 i18n-node-http.js | 2 +-
 1 file changed, 1 insertion(+), 1 deletion(-)
You can use git log to review the latest changes:
$ git log
commit 776aa6d5375037f009f4d4dc8acbe06bd228c214
Author: Other Developer
Date:   Mon Aug 24 16:41:40 2015 -0400

    Changed default locale to es_ES

commit 6a9f8d57dab0db5fb50d4be1b863307bd10c9c0c
Author: bitbucket
Date:   Mon Aug 24 16:25:08 2015 -0400

    Added new locale es_ES
You can use the Transifex Client to push source changes to Transifex. The benefit of this approach is that it ensures everyone has access to the latest translations. However, it could potentially make it more difficult to control who updates the latest translations and when. Features that are still in development can change entirely, and having your localizers work on text that might not appear in the final product would be a waste of time and money. Developers will also need to remember to update localization files when committing their code changes. Enforcing a push policy ensures everyone knows exactly when to sync their changes to the Transifex project.
To update your Transifex project from a local Git repository, make sure your repository is up to date with the remote Bitbucket repository by using git pull. Install the Transifex Client if it’s not already installed. The Transifex Client is based on the Git client and uses a similar command structure. For instance, use the tx init command inside of your project’s root folder to create a new Transifex configuration:
$ tx init
Creating .tx folder...
Transifex instance [https://www.transifex.com]:
Creating skeleton...
Creating config file...
Done.
You should now have a .tx folder inside of your project. Inside of this folder is a configuration file, which contains the information used to identify the project on a Transifex server. For instance, this Node.js app has the project name “i18n” and stores its localization resources in the “locales” directory as standard JSON files.
[main]
host = https://www.transifex.com

[i18n.enjson]
file_filter = locales/.json
source_file = locales/en.json
source_lang = en
type = KEYVALUEJSON
You can add the .tx folder to your Git repository by using git add. When other developers pull your changes, they can use the same configuration file to connect their Transifex clients to the Transifex project.
When you’re ready to push your updated files to Transifex, use the tx push command. The -s flag pushes source files, while the -t flag pushes translation files:
$ tx push -st
Pushing translations for resource i18n.enjson:
Pushing source file (locales/en.json)
Pushing 'de' translations (file: locales/de.json)
Pushing 'es' translations (file: locales/es.json)
Done.
To pull changes into your local project folder, use tx pull:
$ tx pull -a
New translations found for the following languages: de, es
Pulling new translations for resource i18n.enjson (source: locales/en.json)
 -> de: locales/de.json
 -> es: locales/es.json
Done.
From here, simply stage, commit, then push the updated localization files to your Bitbucket repository.
Again, don’t forget to check in for part 2 of this post, Integrating Transifex with Bamboo. For more information on integrating Transifex into your projects, review the Transifex Integrations.