

Angular Localization With Transifex Native
12 min read
What is Angular internationalization?
Angular internationalization refers to the act of preparing your angular app for localization, and this could be separating strings from code, enabling comments for translators, etc.
There are a few different ways to approach Angular internationalization. But in this guide, we are going to be looking at how you can do it with Transifex Native, as we can use it to automate a big part of the process.
Angular internationalization (i18n) is how you prepare your Angular application to adapt and support multiple languages without interrupting its interface. It’s all about preparing the parts of the application that need to be translated, such as text and images, and creating a structure and syntax that can handle the translated content.
Now before we get into the details, let’s quickly understand what software internationalization means.
Internationalization also referred to as i18n, is the process of designing and developing a software application or website so that it can easily adapt to different languages and locales. Localization (l10n), on the other hand, is the process of adapting an internationalized application for a specific language and region. This includes feeding the necessary resources to your application for different markets once it’s internationalized.
Simply put, internationalization makes your application ready for localization. So, it’s a good idea to internationalize your app before you start working on translations.
The most popular approach for Angular internationalization is using the bult-in i18n module or the ngx-translate. However, both of these approaches have a similar drawback: they use files to perform localization and need more effort from your end.
A file-less alternative to internationalize and localize your Angular app is to use Transifex Native. This approach does not require any extra effort from your side – once you insert it in your code, Transifex Native manages all translatable content on its own as well as serves automated push and pull requests and translation updates over the air.
In this tutorial, we will discuss how you can easily integrate Transifex Native into your code and internationalize your Angular application.
To internationalize your app, you first need to add the Transifex Native SDK to your code. Follow the steps given below to complete the Angular internationalization process and make your app ready for localization.
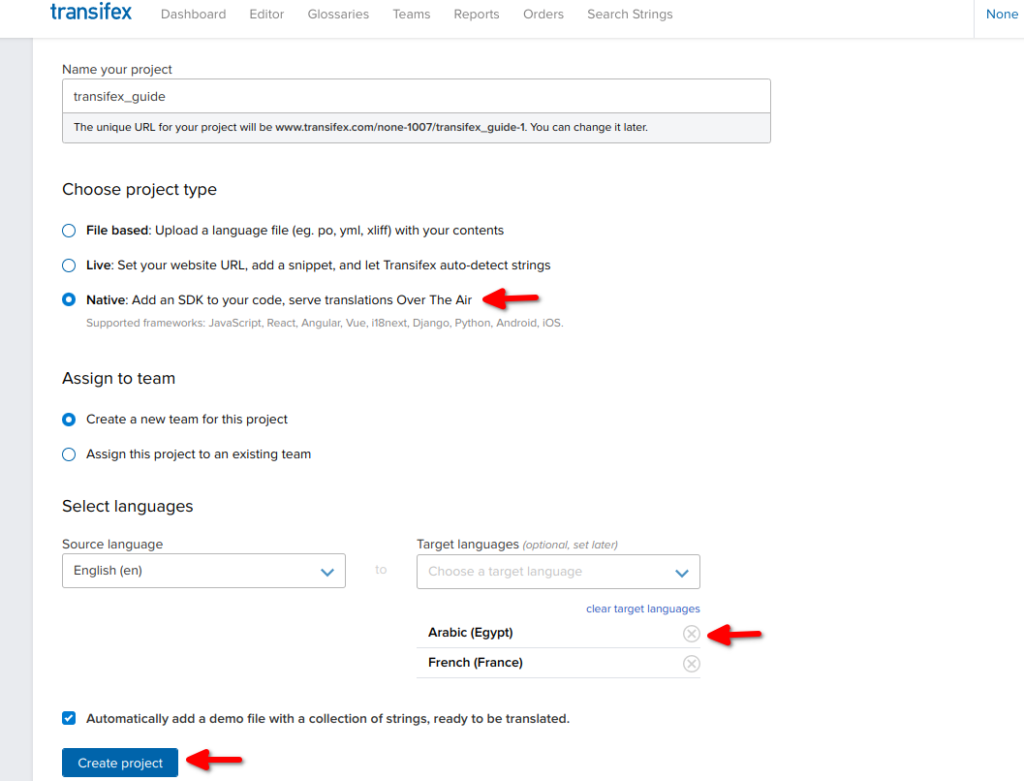
To get started with the app internationalization with the Native SDK, you first need to create a Transifex Native project.
Fill out all the details, and choose “Native” as your project type. Once done, click on “Create Project”.
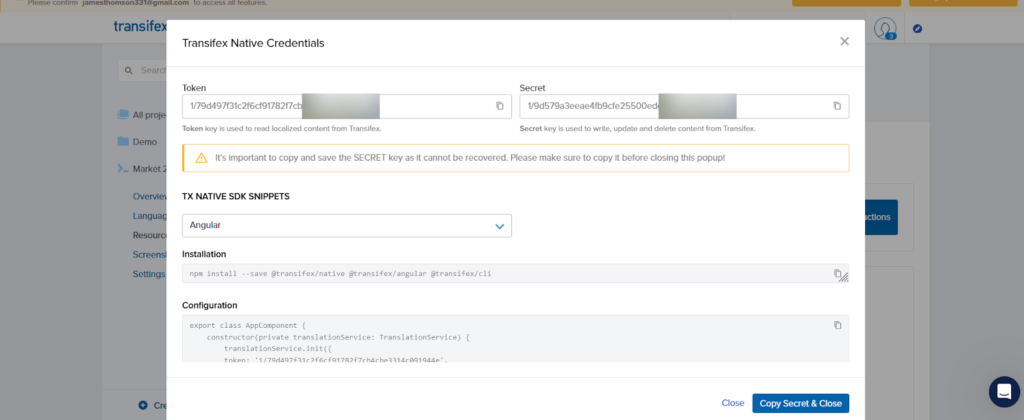
To start using the Native SDK, you will need a set of credentials for the specific Transifex project you want to internationalize. For the Native SDK to communicate with Transifex through the Transifex Content Delivery Service, it requires the following credentials:

Click on “Generate Native Credentials Now”. Ensure that you copy the SECRET key in a safe place because it cannot be recovered.
Now that you have created your TX Native project that needs to be internationalized, it’s time to install the @transifex/angular library extension. This library extends the functionality of Transifex Native JavaScript SDK.
To install the library, you can use the following code:
npm install @transifex/native @transifex/angular @transifex/cli --saveAngular 12, 13, or 14 is required to use Transifex Native-related packages. If you are using Angular 11, please use the 1.x.x version of Transifex Native. Please note that other Angular versions are not officially supported at the moment.
Two places in the angular application bootstrap must be initialized in order to use the TX Native object globally:
Adding the Native module to your code is necessary for Transifex to access all the elements provided by the Native Angular SDK.
To initialize the NgModule, use this code:
@NgModule({
 declarations: [
  App component,
  LoginComponent,
  TermsComponent,
  HomeComponent,
  PrivacyComponent
 ],
 imports: [
  AppRoutingModule,
  BrowserModule,

  // TX Native module declaration
  TXNativeModule,forRoot(),
 ],
 providers: [,
 ],
 bootstrap: [AppComponent]
})In order to use the Translation Service provided by the SDK, you need to insert the token generated by Transifex and initialize the library with it. The translation service is a singleton object of TX Native that can be used in any part of the application.
import { Component } from '@angular/core';
import { TranslationService } from '@transifex/angular';

@Component({
    selector: 'app-root',
    templateUrl: './app.component.html',
    styleUrls: ['./app.component.scss']
})
export class AppComponent {
   constructor(private translationService: TranslationServ
     // TX Native library initialization
     translationService.init({
      token: '--- insert your TX Native token here -----',
     });
    });

    async ngOnInit() {
      await this.translationService.getLanguages();
      await this.translationService.setCurrentLocale('el');
    }
}
And now, you have successfully installed the TX Native SDK to your application.
For Angular app localization, it’s important to mark the components that need to be localized during the i18n process. TX Native has multiple components that can help you do so, including:
Use this component to mark the strings that need to be translated. Here’s an example to help you understand better:
<p>
    <label>
      <T str="Password" key="label.password"></T>
    </label>
    <input type="password" name="password" />
</p>
Here are a few props:
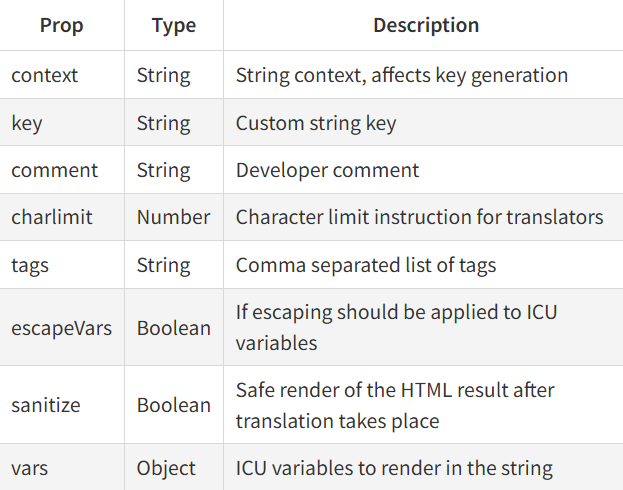
The T component can safely render the HTML result after translation using the parameter sanitize. It is important to ensure that the str (Source String) property on the T component is always a valid ICU message format template.
If it is nested into a tx-instance tag, then the T component will use the new instance to fetch the translation.
UT component has the same behavior as T, but it renders the source string as HTML inside a div tag or a span tag if the inline property is true. By default, this property is set to false. If UT is nested into a tx-instance tag, then the component will use new instances to fetch translations.
The available optional props for UT component are the same as T component but it has escapeVars property enabled by default:

This is the main service exposed by the SDK to initialize the Native object. This initialization will be shared across the entire application – inside your libraries, components, or the code.
The Translation Service also keeps a collection of TX Native instances that can be added to the default instance for specific purposes, where the additional instance should have the following configuration:
![]()
If you want to retrieve the additional instances, you can do so using exposed methods: addInstance and getInstance.
The service also allows you to retrieve translations that match a given list of tags. This makes it possible to fetch groups of translations in batches, at different times or for lazy loading. To implement this, use the fetchTranslations method.
This decorator is used inside classes and components to have properties with the translation and use them in code and templates.
Any alternative instance can be used for the decorator instead of the main TX Native one. To do this, an instance configuration must be passed to the @T decorator.
The translate pipe can be used in the templates for inline string translations. However, the only limitation of using this is it cannot translate strings with embedded HTML.
Here’s an example of embedded HTML code that will not work:
{{ 'A string with <b>HTML embedded</b>' | translate }}In case the translate pipe is nested within a tx-instance tag, it will use a new instance to fetch translation.
This component is what changes your language when the locale is changed. To execute this, the language picker component uses the Translation Service internally.
The component accepts properties:
And returns this property:
In theory, it renders a <select> tag that displays supported languages and switches the application’s selected language on change. Here’s an example:
<tx-language-picker
 className='placeBottomLeft"
 (localeChanged)='onLocaleChanged($event)'></tx-language-picker>
The HTML selector is a tx-language-picker. The event for locale change inside the component could be:
import { Component, OnInit } from '@angular/core';
import { Router } from '@angular/router':
import { T, TranslationService } from '@transifex/angular':

@Component({
 selector: 'app-login',
 templateUrl: './login.component.html',
 styleUrls: {'./login.component.scss']
})
export class LoginComponent implements OnInit {
 onLocaleChanged(event)  {
    /here we can do any action when the locale changes
 }
}
You can always implement a language picker of your choice using the Translation Service and use different methods such as getLanguages provided by the Native.
This is used to create a new TX Native instance with the given configuration and add it to the TX Native main instance. It uses the Translation Service internally to add the instance. All the nested components now use the new instance in order to fetch the translations.
This is applicable for these components:
The TX component accepts the following properties:
And returns this property:
And exposes this property:
This directive is used within any HTML or Angular tag if you want to force a group of translations to be fetched. This is done using a list of tags to retrieve the translations that match.
All the translations with the chosen tag will be fetched using the instance and the currently selected locale. In the event that the translations are already cached, they are not fetched again.
Transifex Native utilizes the ICU Message Format to enable one single program to work with text in different languages from any place in the world. For internationalization of the content, the phrases to be localized should be encapsulated in the t function.
Here’s an example:
import { t } from '@transifex/native';

t('Hello');
t(;Hello <b>{username}</b>', { username: 'Joe" });Transifex Native uses several parameter keys to annotate the string with metadata that will be used in Transifex. Here’s a list of supported parameter keys:
To ensure you have the correct translated phrases at all times, your text must be escapeable in certain scenarios, for example, an XSS attack.
To escape the entire phrase, use the following code:
import { t,escape } from '@transifex/native';

const translation = escape(t('Hello {username}', { username }));
// translation i ssafe to include in HTMLIt is a good idea to not use the translation, as it is directly from the t function inside the HTML. However, HTML source content cannot be globally escaped.
In this case, you can instead escape the ICU variables using the _escapeVars parameter by using the following code:
const html = t('<b>Hello {username}</b>', {
 username; username,
 _escapeVars: true,
});By now, you are already aware of how to internationalize your Angular application before you start localizing it. Here are 3 best practices to keep in mind to get the most out of your app internationalization.
For translations to naturally fit the user interface of your application, it’s important to create a flexible accommodation for the translatable texts. For example, a word with five letters in English may consist of fifteen letters in Japanese.
It’s a good idea to prepare your application design for such scenarios during the internationalization process.
However, asking translators for every word for design purposes can become complex, which is where localization software like Transifex can help. Not only during the internationalization phase but also during localization, thanks to design integrations such as Figma/Sketch and features like comments.
You can also create a placeholder for the translatable text. This allows you to create space for the contents as they appear in the selected language instead of typing them manually.
Internationalization and localization of your Angular app is not simply translating texts but also considering different factors for a given region including their date, currencies, preferred font, symbols, etc.
There are also multiple languages that read from “right to left,” unlike English, for example, Urdu or Persian. To serve different markets, you must ensure your localization team takes these factors into account before the software internationalization.
Pseudo localization is all about testing your localization before the app goes live. By doing it, you catch bugs early and prevent your app users from ever seeing them.
Internationalization (l18n) is an important step to ensure your app is fully prepared for localization. While the in-built l18n library is the most popular way to internationalize and localize your Angular app, because of its file-based approach, it can quickly become complex, especially if you are looking to scale.
Localization software like Transifex Native can help you bypass this and automate the entire process for you.
We hope this guide helped you internationalize your Angular app more efficiently.
And if you are ready to move forward with localization, take a look at our Angular localization guide!