


Angular Localization With Transifex Native
12 min read
Vue internationalization (i18n) is all about preparing your Vue app to support many languages and get to the next step: Vue localization. In this article, we will explore how to easily achieve this by using Transifex Native!
To be more specific, we are referring to the Transifex Vue SDK, which, in combination with the TX editor, helps you to bridge the gap between developers and translators by allowing to focus on programming while still collaborating with translators to translate your website, even if they are not technically proficient.
For this article, I’ll be using a profile page developed with Vue.js. I encourage you to clone this repository so you can follow along. I won’t go into detail on how I came up with this simple profile page because this is a localization article, but, simply put, it’s some HTML and CSS.
The first step is to sign up for a Transifex account here. You can quickly sign up using your GitHub, Google, or LinkedIn account. Transifex offers a free 15-day trial as well as a free-forever plan for open-source projects!
After you’ve set up an account, the next step would be to create a project. You must provide a project name and choose “Native” as the project type. Finally, you must specify the primary language of your application as well as the language(s) into which it will be translated. For this guide, I’ll select English as the primary language with French and German being my target languages.
Once you’re done, click on the Create Project button. After that, you’ll be led to the next page, where you’ll find instructions on how to generate credentials for your project. Click on “Generate Native Credentials Now” at the bottom of the page.
This will display the API token and secret key in a pop-up window. Make a copy of both keys because you’ll need them later. This will also display certain configurations that will be required to set up our vue.js application.
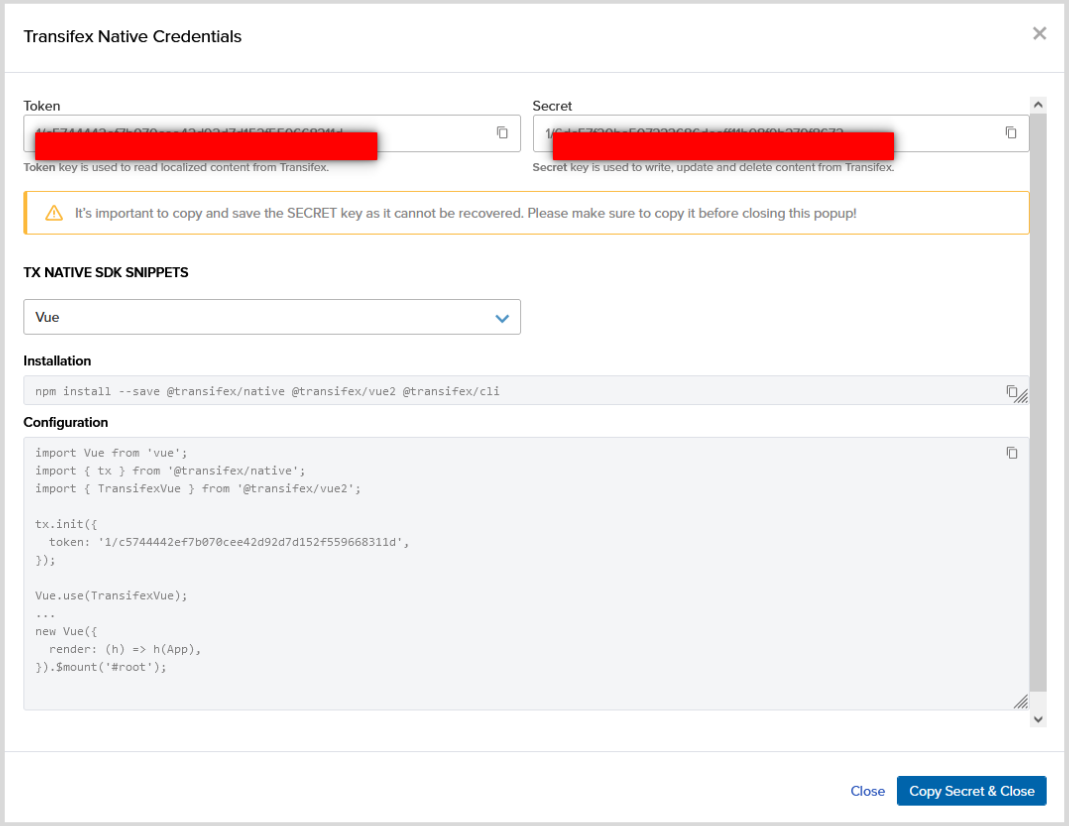
Once that is done, you can now proceed to push the Vue.js application content to Transifex and then internationalize it.
The first step to localizing your vue.js application is to install the library and its dependencies using:
npm install @transifex/native @transifex/vue2 @transifex/cli --save@transifex/native is the library, @transifex/vue2 is a Vue2 component for localizing Vue apps with Transifex Native; and @transifex/cli is a command line tool that parses .js, .ts, .jsx, .tsx and .html source files, extracts phrases marked for localization by Transifex Native, and pushes them to Transifex for translation.
Once that is complete, the next step is to configure/initiate the plugin in the app. To do so, just copy the code below and paste it into your main.js file, or modify your main.js to include the following:
import Vue from 'vue';

import App from './App.vue';

import { tx } from '@transifex/native';

import { TransifexVue } from '@transifex/vue2';

tx.init({

  token: '<token>',

});

Vue.use(TransifexVue);

new Vue({

  render: (h) => h(App),

}).$mount('#app');
Note: Ensure you replace <token> with your token which you copied earlier or we can decide to make use of an environment variable.
You may now make any string translatable. To do this, the Transifex Native SDK for vue.js includes a component T that may be used to indicate that a text is translatable.
All you have to do is replace contents to look like this:
<span><T _str="Web developer" /></span>// and for paragraph
<p>

  <T _str="Joel Olawanle is a Frontend developer with expertise in vue.js and React.js alongside Jamstack frameworks like Nuxt,Next.js and Gridsome. He is highly skilled at converting images/UI designs into frontend codes (UI developer). He is also a Technical writer interested in making the web accessible to everyone by always looking for ways to give back to the tech community. Furthermore, he is currently taking a deep dive into React and Headless CMS of which he is doing a lot of writing on as he learns new things. He is a big fan of open source." />

</p>
T can also accept the following props:
| Prop | Type | Description |
| _str | String | Source string |
| _context | String | String context, affects key generation |
| _key | String | Custom string key |
| _comment | String | Developer comment |
| _charlimit | Number | Character limit instruction for translators |
| _tags | String | Comma separated list of tags |
Transifex allows us to push our contents easily using a very simple command in our terminal:
npx txjs-cli push src --token=<TOKEN> --secret=<SECRET>We could decide to simplify the command so we don’t have to type this over and over again by adding this command in package.json scripts object:
"scripts": {

  ...,

  "push-translation": "txjs-cli push src --token=<TOKEN> --secret=<SECRET>"

}
Note: Make sure to replace the <TOKEN> with your API token key and <SECRET> with your API secret key.
Once you save, you’ll now be able to run the following command:
npm run push-translationIf this is successful, all your content will be pushed to Transifex for you to handle translations.
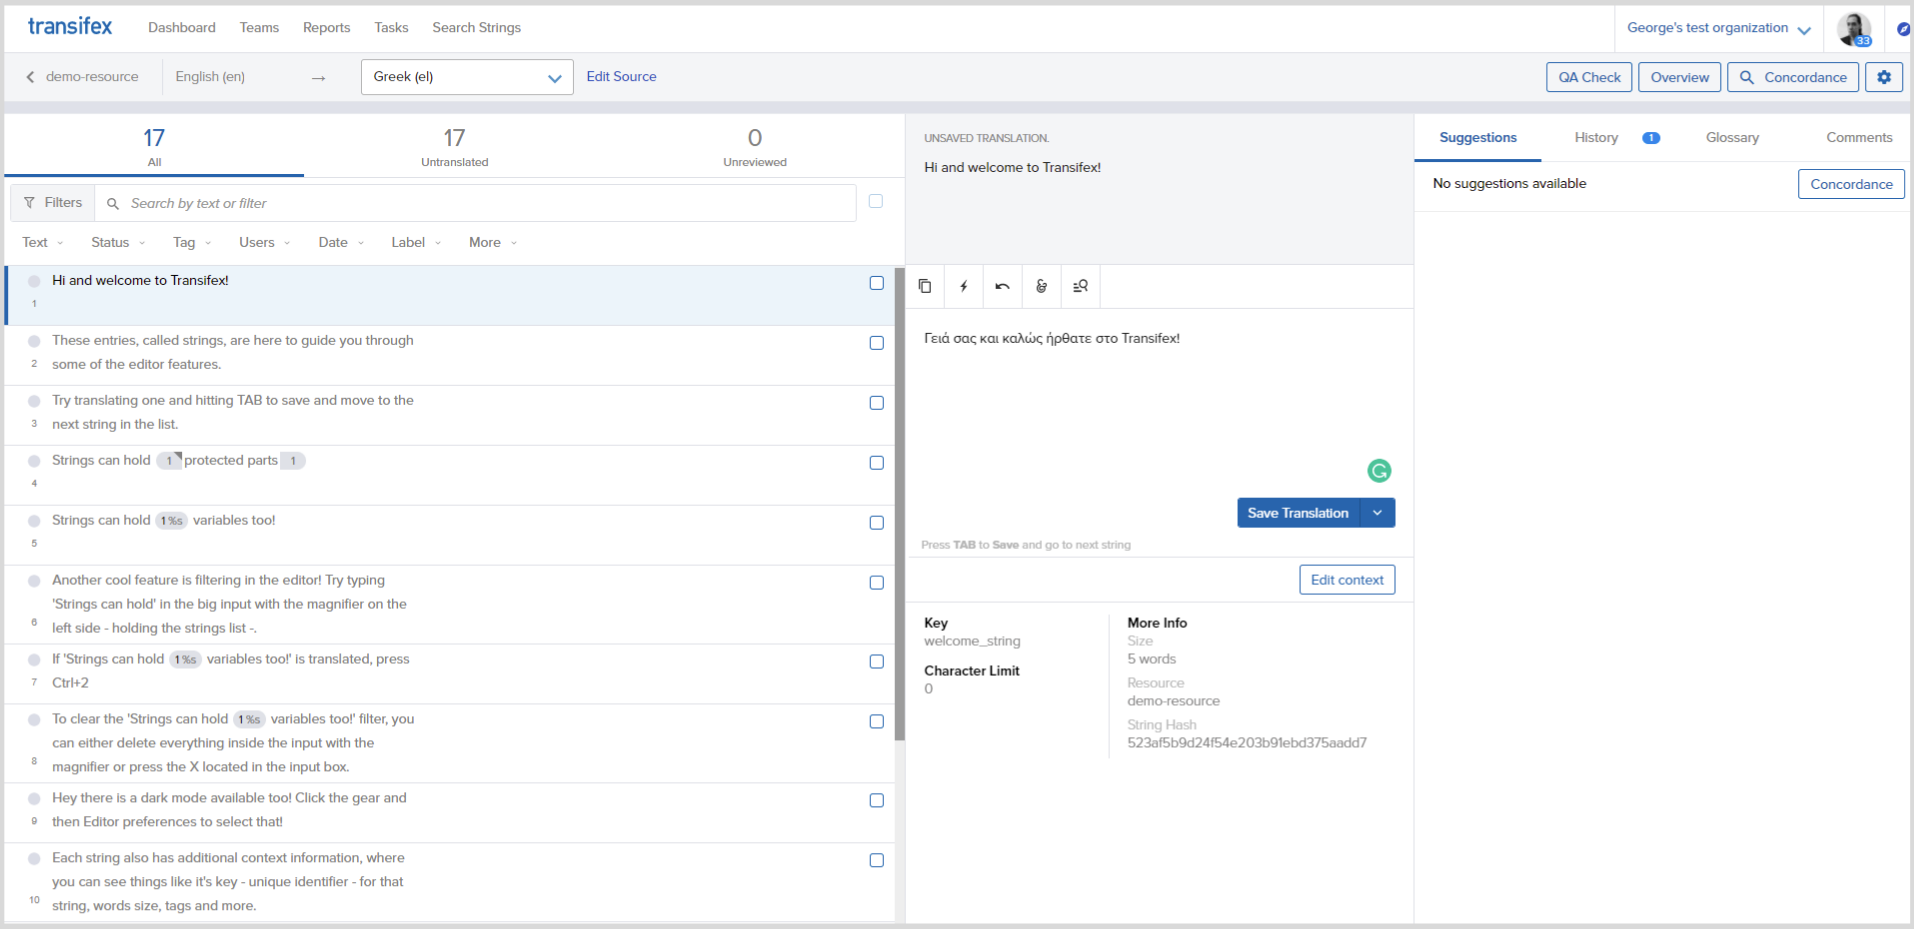
Once you have pushed your contents to Transifex, the next thing will be to handle translations. Go to your Projects dashboard and click on the translate button at the top right.
This will redirect you to a new page where you can select the language to translate the strings for you to be able to add translations for each string using the editor.
Note: Transifex is a Translation Management System, not a machine translation tool or a Translation Vendor.
Transifex offers machine translations via the interface, as well as human translations with our partners (as described here). You can make use of machine translation, order translations, invite collaborators, and/or do the translations yourself.
To follow this guide, you will handle translations yourself, this is easy to do via the editor.
The last major step would be to easily switch between languages on your application and witness translation happening in real time.
It is important for you to know that any new translations are available to your Vue.js app within the hour.
The Transifex Native Vue.js SDK has an inbuilt component (useLanguages) that allows you to retrieve the available languages in your project. This renders a <select> tag that displays supported languages and switches the application’s selected language on change.
The first thing will be to import the component in the file you wish to make use of the component, and then call the component. It’s as simple as that.
<template>

  <div class="main">

    <div class="profile-header">

      <div class="profile-img">

        <img src="./assets/user.jpg" class="profile-pic" alt="" />

      </div>

      <h2>Joel Olawanle</h2>

      <span><T _str="Web developer" /></span>

    </div>

    <div class="profile-info">

      <p>

        <T _str="Joel Olawanle is a Frontend developer with expertise in vue.js and React.js alongside Jamstack frameworks like Nuxt, Next.js and Gridsome. He is highly skilled at converting images/UI designs into frontend codes (UI developer). He is also a Technical writer interested in making the web accessible to everyone by always looking for ways to give back to the tech community. Furthermore, he is currently taking a deep dive into React and Headless CMS of which he is doing a lot of writing on as he learns new things. He is a big fan of open source." />

      </p>

    </div>

    <LanguagePicker class="lang"/>

  </div>

</template>


<script>

//import language picker component

import { LanguagePicker } from '@transifex/vue2';

  export default {

    name: 'App',

    components: {

      LanguagePicker,

    },

  };

</script>
Which should lead to that kind of result:

Transifex operates similarly to a CDN in that it delivers all translations from a cache, allowing for speedy retrieval. Its SDK is simple to install and set up, and all commands, including the push command, are simple to use. You’ll also find that Transifex Native SDK is a way simpler localization library than the ones you already know, as you won’t need any additional json files for your translated text.
Finally, the biggest advantage of utilizing Transifex Native is that the translations are not included in your codebase, as we just saw with vue.js. Transifex Native also supports Vu3. The @transifex/vue3 library is fully documented in the developer hub.I really hope this article was helpful, and you can check out the Transifex documentation if you need more information.