


TX Labs: A Space for Accelerated AI Innovation
3 min read
Jenkins, an Open Source continuous integration server, supports Transifex projects using a few simple shell commands. In this post, we’ll show you how to configure Jenkins to automatically synchronize with a Transifex project.
Jenkins automates the process of running repeating tasks such as executing scripts or building software packages from source. Jenkins also monitors the status of running jobs, provides alerts, and integrates with external build services such as Maven and Ant.
Each job is assigned a workspace, which is a directory where copies of the job’s source files are stored. For instance, in Ubuntu, these directories fall under /var/lib/jenkins/workspace/. If your project is managed by source control, Jenkins will automatically pull the latest revision from your source repository. Otherwise, you’ll need to copy your source files to the job’s workspace after creating the new job in Jenkins.
One of the benefits of Jenkins is that it can execute shell scripts during the build cycle. This makes it easy to integrate Transifex by simply calling the Transifex Client. Using tx push and tx pull, you can have Jenkins automatically update your source and translation files as the project is built.
Before Jenkins can use the Transifex Client, it has to be able to read your project’s configuration. By default, the Transifex Client stores its configuration settings on a per-user basis. On a Linux environment, this is typically /home/<user>/.transifexrc. However, Jenkins executes commands as the Jenkins user. For instance, in Ubuntu, this means that any user-specific configuration files for Jenkins should be stored in /var/lib/jenkins/.
To configure your project for Jenkins, copy your transifexrc file to /var/lib/jenkins/.transifexrc. If you manage multiple jobs with Jenkins, you can store .transifexrc in the job’s workspace. Keep in mind that .transifexrc contains sensitive account information and shouldn’t be viewable by anyone but the Jenkins user.
You’ll also need to make sure that your project is configured to use the Transifex Client. Running tx init in your project folder will generate a .tx directory containing a configuration file. This configuration file tells the Transifex Client how to connect to your localization repository. Unlike the .transifexrc file, we recommend checking the .tx directory and config file into your source control repository. That way, when Jenkins checks out the project, it has everything it needs to connect to Transifex.
Once you’ve granted Jenkins permission to access your Transifex project, you can configure your Jenkins job. As the job executes, Jenkins will call the Transifex client and update the project’s localization files.
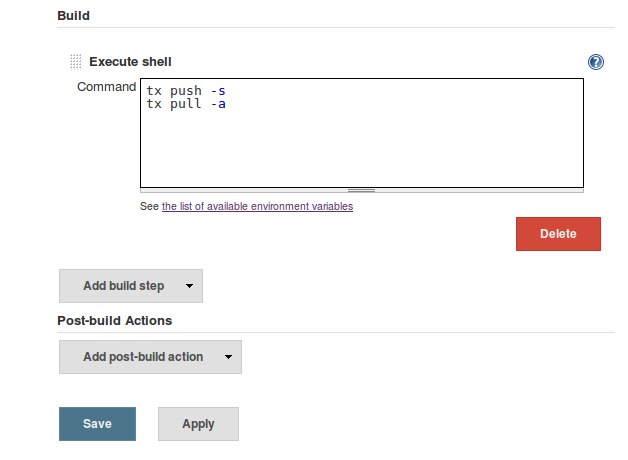
Navigate to the job’s configuration page. Under the “Build” section, click “Add build step”, and select “Execute shell”. A text box appears, allowing you to enter commands. Enter the following commands and click Save:
tx push -s
tx pull -a
The next time a build occurs, Jenkins uses the Transifex Client to not only push your source files to Transifex but also to pull the most recent translations into the build.
Modifying Downloaded Translation Files
If you need to further modify your language files before including them in the build, you can run additional commands by either adding new statements or by adding a new build step. You can perform any command-line task supported by the operating system running Jenkins, such as converting between file types or moving files to a separate directory. For instance, if you haven’t set up your project using a file expression, you’ll have to manually move your translation files into the target directory.
Integrating Transifex with Jenkins is fairly straightforward, but problems can arise during the process. Two issues in particular are extremely common: file permissions and build failures due to the Transifex Client.
As we mentioned earlier, the Jenkins user must have access to project files. If permissions aren’t properly assigned, this could result in opening Jenkins or your Transifex project to outside access. When copying files to a Jenkins workspace, make sure those files can only be modified by the Jenkins user. If you’re copying a .transifexrc file to the Jenkins workspace, make sure the file can only be read by the Jenkins user.
If you manage your project using version control, Jenkins will automatically fetch and store files as the Jenkins user. However, this does mean providing Jenkins with access to your source repository. Some version control systems such as Git allow you to use file permissions to prevent users from modifying checked out files. Alternatively, hosting providers such as GitHub provide advanced controls for limiting users’ ability to push to repositories.
Common causes of build failures are a missing .transifexrc file, or Jenkins not having the right permissions to read your project’s files. Make sure your .transifexrc file is not only stored in Jenkin’s configuration directory but is also readable by the Jenkins user.
You should also make sure that your project configuration and source files can be read by Jenkins. If you copied your source files manually, you’ll need to grant permission to the Jenkins user to read and modify files in the project directory.
If the build continues to fail, try running the Transifex Client as the Jenkins user and viewing the immediate output. After logging into the Jenkins server, use the sudo command to temporarily switch to the Jenkins user:
$ sudo -iu jenkins cd /path/to/workspace && tx push -s
Any output from the Transifex Client will appear directly in the console. You can also view output from the Transifex Client by opening Jenkins, navigating to your project’s build history, and clicking on Console Output for the last build.
Using the Transifex Client through Jenkins is the easiest way to ensure your builds are using the latest translations. You can also install the Transifex Plugin for Jenkins, which simply adds a hyperlink to the Transifex project page on the Jenkins job page.
For more information on integrating Transifex into your projects, review the Transifex Integrations.